ServerlessのTypeScript公式テンプレートを使ってみる
Serverlessをしばらく触ってこなかったので、気づかなかったのですが、v1.21.0からsls createの際に指定する公式テンプレートにaws-nodejs-typescriptと言うものが追加されたようです。(結構前ですね...)
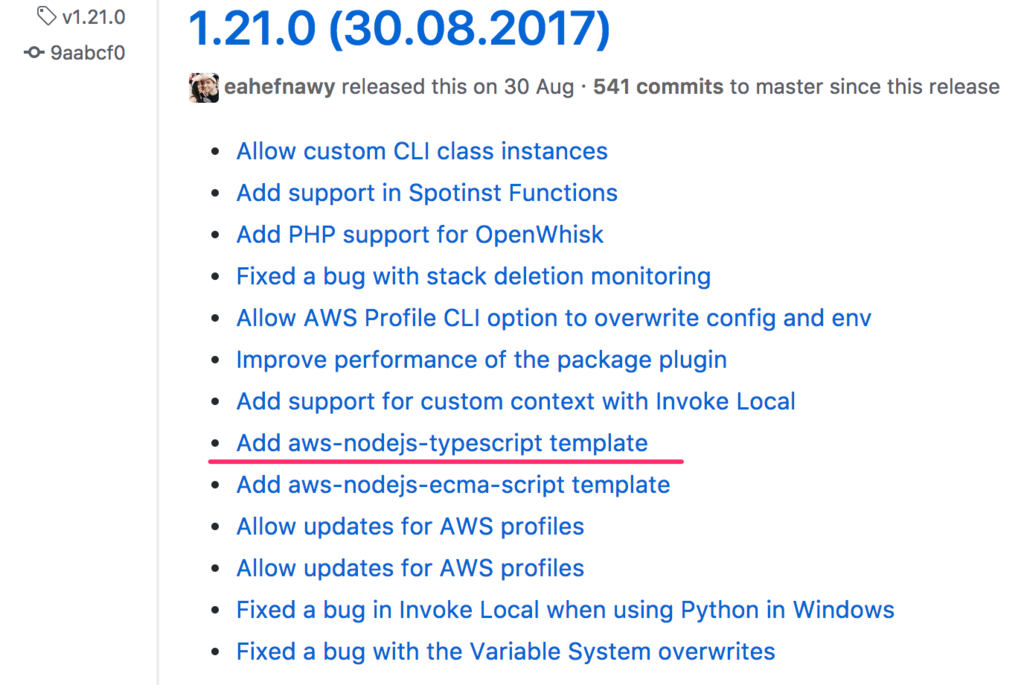
以前から、プラグインとして、serverless-webpackというものがあり、デプロイコマンド実行時にwebpackを使ってTypeScript→JavaScriptへのビルドタスクを実行するという方法がありましたが、公式テンプレートでもserverless-webpackを使う際の一連のセットアップなどが済んだテンプレートを提供しているようです。
使ってみる
テンプレートからプロジェクトを作成して、とりあえずデプロイしてみます。
プロジェクトの作成
まずは、serverlessのインストールから。
インストールしたバージョンは、現時点での最新版1.24.0になります。
$ npm i -g serverless
createコマンドでテンプレートからプロジェクトを作成してみます。
$ sls create -t aws-nodejs-typescript -p sls-ts
作成したプロジェクトの内容を確認ると、次のファイルが作成されていました。
./sls-ts/
├── handler.ts
├── package.json
├── serverless.yml
├── tsconfig.json
└── webpack.config.js
aws-nodejsのテンプレートで作成した際に作成される、ファイルに加え、package.json、tsconfig.json、webpack.config.jsが作成されるようです。
それぞれのファイルの内容を見ていきます。
package.json
プラグインであるserverless-webpack、webpackで使うTypeScriptのローダーなどがインストールされているようです。
{
  "name": "aws-nodejs-typescript",
  "version": "1.0.0",
  "description": "Serverless webpack example using Typescript",
  "main": "handler.js",
  "scripts": {
    "test": "echo \"Error: no test specified\" && exit 1"
  },
  "devDependencies": {
    "serverless-webpack": "^3.0.0",
    "ts-loader": "^2.3.7",
    "typescript": "^2.5.2",
    "webpack": "^3.6.0"
  },
  "author": "The serverless webpack authors (https://github.com/elastic-coders/serverless-webpack)",
  "license": "MIT"
}
serverless.yml
pluginsにserverless-webpackが設定されています。
service:
  name: aws-nodejs-typescript

# Add the serverless-webpack plugin
plugins:
  - serverless-webpack

provider:
  name: aws
  runtime: nodejs6.10

functions:
  hello:
    handler: handler.hello
    events:
      - http:
          method: get
          path: hello
webpack.config.js
entry にslsw.lib.entriesが指定されていますが、これはserverless-webpack側でエントリポイントを自動で解決してくれているらしいです。(./handler.tsを指定したい気分ですが、どんな動きになっているかは後々調べてみよう...)
ts-loaderの設定もされた状態ですね。
const path = require('path');
const slsw = require('serverless-webpack');

module.exports = {
  entry: slsw.lib.entries,
  resolve: {
    extensions: [
      '.js',
      '.jsx',
      '.json',
      '.ts',
      '.tsx'
    ]
  },
  output: {
    libraryTarget: 'commonjs',
    path: path.join(__dirname, '.webpack'),
    filename: '[name].js',
  },
  target: 'node',
  module: {
    loaders: [
      { test: /\.ts(x?)$/, loader: 'ts-loader' },
    ],
  },
};
その他のファイルに関しては、割愛します。
とりあえずデプロイしてみる
AWS CLIで必要なcredentが設定されている前提で、デプロイをしてみます。
$ sls deploy
デプロイ中のコンソールを眺めていると、まずwebpack(ts-loader)でTypeScriptが実行され、終わったタイミングでServerlessの実行結果が流れ始めるのがわかります。 ※ グローバルにTypeScriptがインストールされた環境で実行した場合は、そちらが使われるようです。
また、デプロイが完了後に.serverlessディレクトリ以下に生成されている.zipファイルの内容を確認してみると、JavaScriptにビルド済みのhandler.jsが確認できるかと思います。
作成されたAPI Gatewayのエンドポイントを叩いてみると...

動いてますね。
所感
webpackの設定なしに、気軽にTypeScriptが使えるようになってて最高です。
Angularでテキストファイルを読み込む
Angularでブラウザから読み込んだローカルのテキストファイルを表示する方法です。
HTML5のFile APIの基本的な使い方が分かれば簡単な内容ですが、メモ程度に残しておきます。
早速、実装していきたいと思います。
以下で紹介する内容は、angluar-cliでng newしたプロジェクトのapp.componentにべた書きしているので、試しに動かす際はコピペすれば動くはずです。
環境
この記事で紹介する内容は、以下の環境で試しています。
$ ng -v
@angular/cli: 1.4.1
node: 8.1.3
実装例
まずは、テンプレート側です。
テキストファイルを読み込むための<input>と、読み込んだテキストの内容を表示するための<p>タグを配置しました。
<!-- テキストファイルを選択するinput -->
<input type="file" (change)="onChangeInput($event)">

<!-- テキストファイルの内容を表示するエリア -->
<p>{{readText}}</p>
次に、クラス側です。
まず、inputのchangeイベントにバインドされたonChangeInput()メソッド内で、fileオブジェクトをfileToText()メソッドに渡しています。
fileToText()メソッドは、FileReaderの結果をPromiseで返します。
※ここではエンコーディング未指定なので、デフォルトのUTF-8 で解釈されます。
import { Component } from '@angular/core';

@Component({
  selector: 'app-root',
  templateUrl: './app.component.html',
  styleUrls: ['./app.component.css']
})
export class AppComponent {
  public readText: string = null;

  onChangeInput(evt) {
    const file = evt.target.files[0];
    this.fileToText(file)
      .then(text => {
        this.readText = text;
      })
      .catch(err => console.log(err));
  }

  fileToText(file): Promise<string> {
    const reader = new FileReader();
    reader.readAsText(file);
    return new Promise((resolve, reject) => {
      reader.onload = () => {
        resolve(reader.result);
      };
      reader.onerror = () => {
        reject(reader.error);
      };
    });
  }
}
読み込んだテキストが正しく改行されるように、cssも修正しておきます。
p {
  white-space: pre-wrap;
}
試してみる
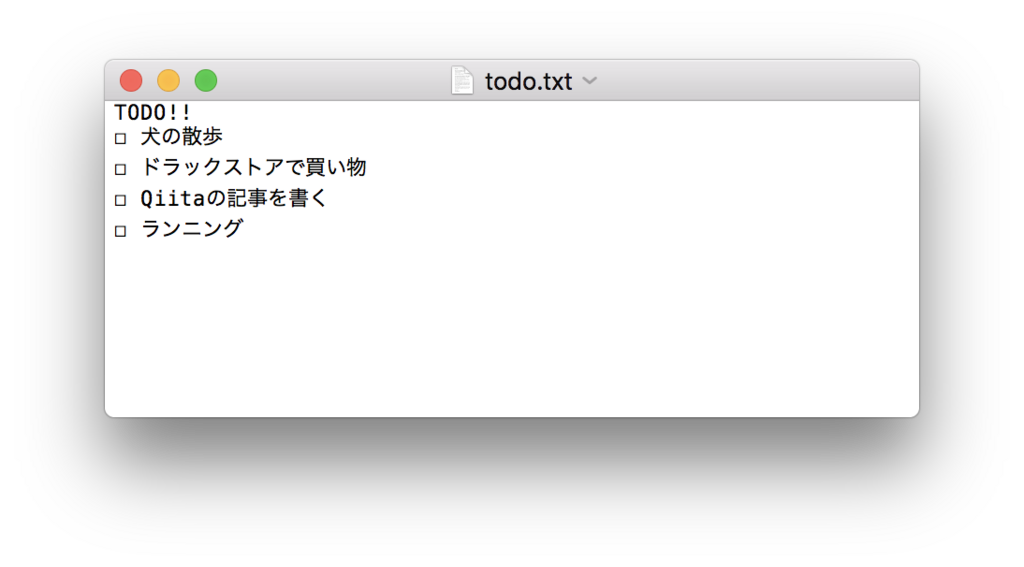
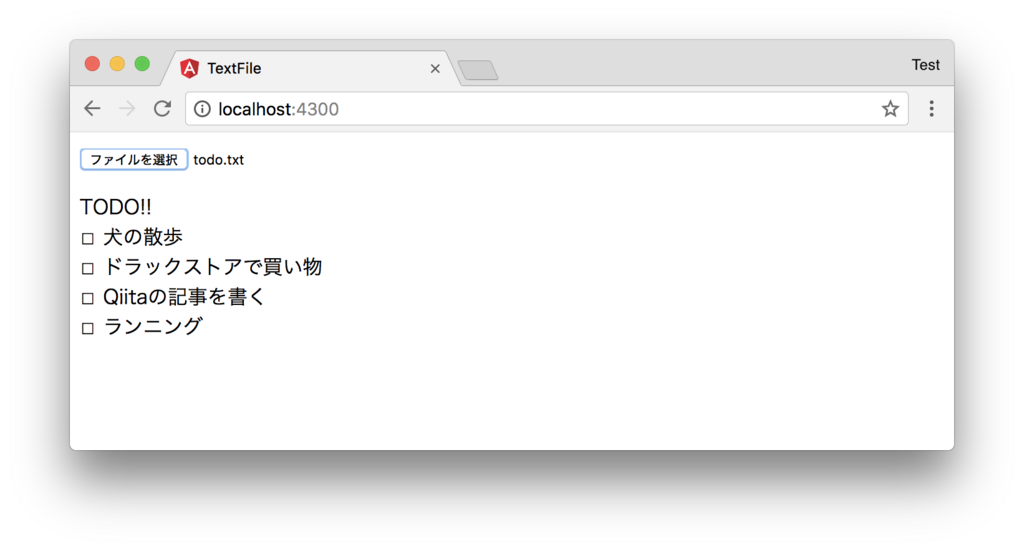
試しに、次のようなファイルをアップロードしてみます。
用意したテキストファイル
inputから用意したテキストファイルを選択した結果
以上です。
参考
Angularで画像読み込みに失敗した際の代替えイメージを指定するimgディレクティブを作成
画像読み込みに失敗(404エラーなど)した場合に代替えイメージを表示する方法です。
コンポーネント内で対応する方法
簡単な方法としては、次のような方法があります。
VIew
<img src="imageUrl" (error)="onImageLoadingError">
ViewModel
export class TestComponent {

  imageUrl = 'https://www.gstatic.com/webp/gallery3/2.png';
  defImageUrl = '../assets/images/default.png';
  constructor() { }

  onImageLoadingError() {
    this.imageUrl = this.defImageUrl;
  }

}
上記の方法では、imgタグの errorイベントを受けてコンポーネント側で保持している、イメージURLを代替えイメージのURLで置き換えるという方法です。
今回は、imgタグに属性ディレクティブを追加する形で代替えイメージの指定を行ってみます。
imgディレクティブを作成して対応する方法
Angularのディレクティブの作成はangular-cli
を使えば、app.moduleへの登録を含め簡単に行うことが出来ます。
次のコマンドでベースとなるディレクティブを作成します。
ng g d directives/defaultImage
コマンド実行後には、app/directives ディレクトリ以下に次のファイルが作成され、app.moduleへの登録も自動で行われています。
- default-image.directive.ts
- default-image.directive.spec.ts
default-image.directive.ts
import { Directive, Input, HostListener, HostBinding } from '@angular/core';
// Input, HostListener, HostBindingを追加

@Directive({
  selector: 'img[default]',
})
export class DefaultImageDirective {
  @Input() default: string;

  @HostBinding('attr.src') @Input() src;
  @HostListener('error') updateSrc() {
    this.src = this.default;
  }
}
あとは、次のように使うだけです。
View
<img src="http://img.tiqav.com/ah.th.gifhttp://img.tiqav.com/ah.th.gif" default="../assets/images/default.png">
Angular MaterialでRouterと連携するTabを実装
Angular Materialで次のようなTabsを使ったUIを実装する方法です。
今回実現したのは👇こんな感じの動きです。
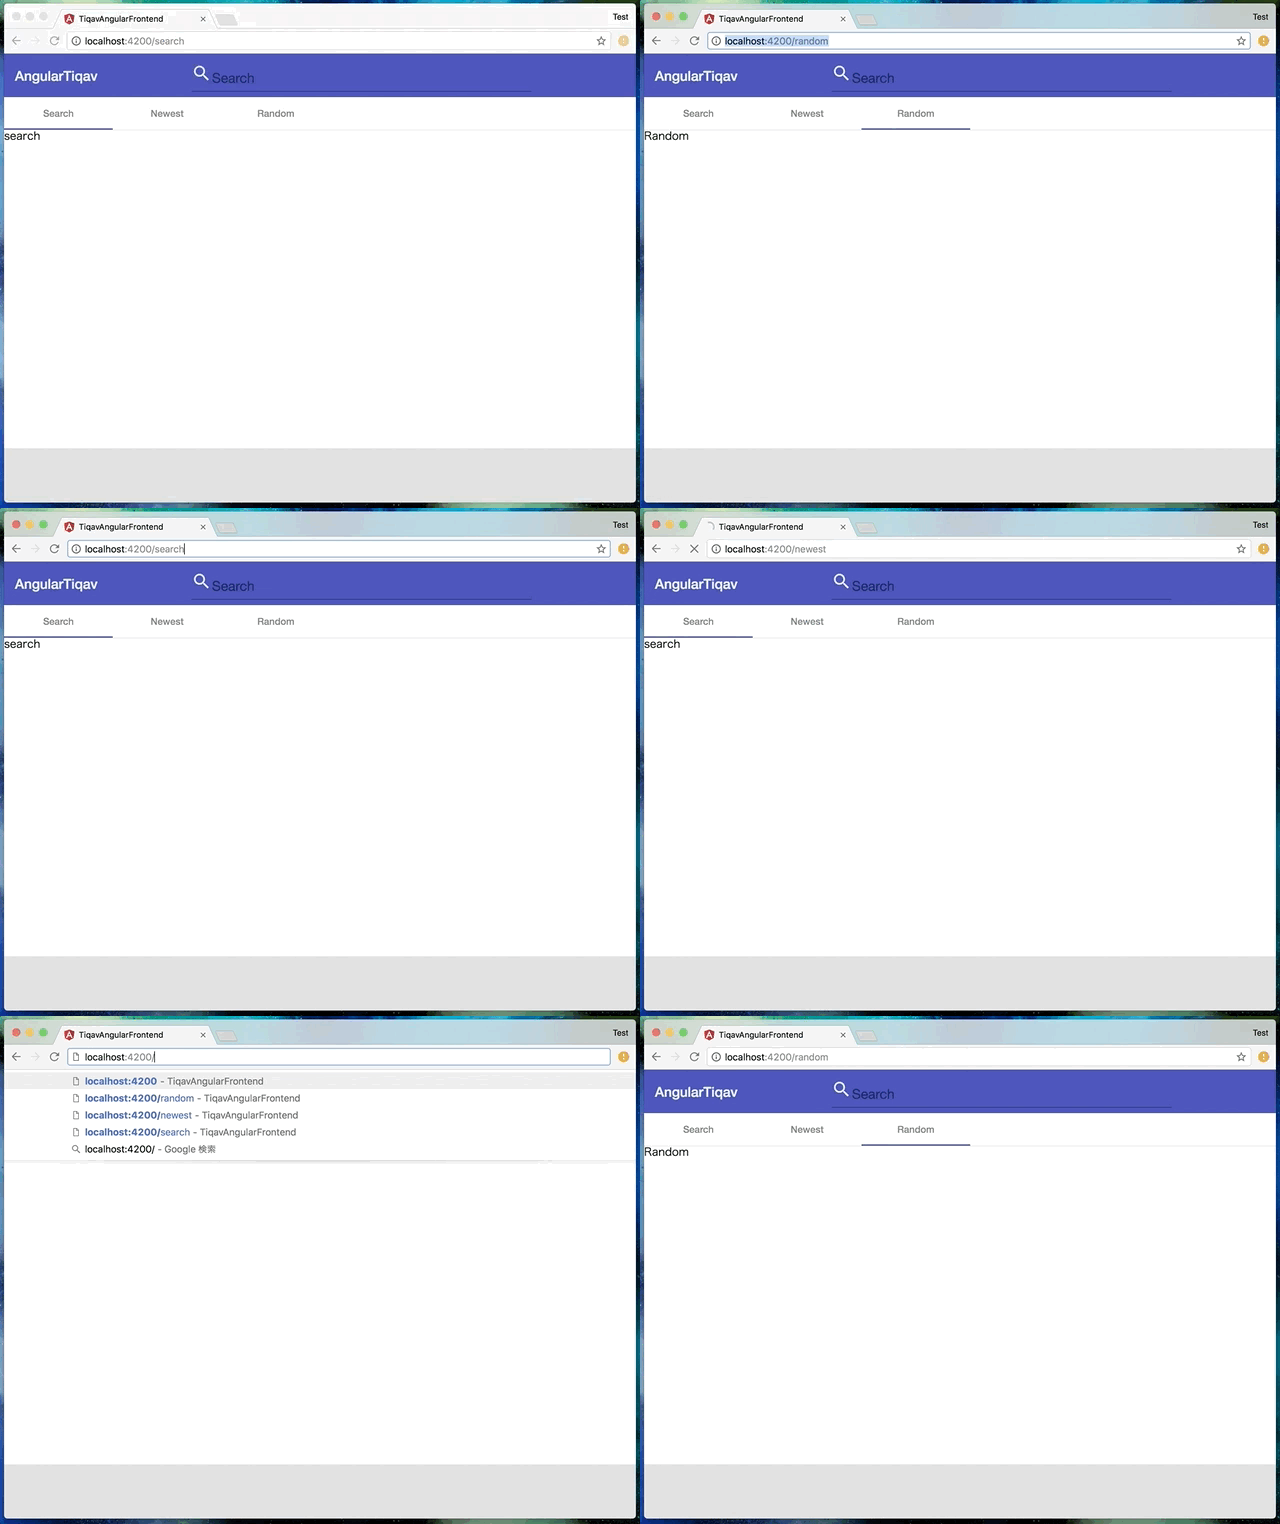
動きを見て分かるように、URLの変化に合わせてアクティブなtabと内容が変更されます。
以下のStackOverflowにあるサンプルコードを参考に、routerとmd-tab-nav-barの連携を行いましたが、これだけでは、URLが直接変更された場合に対応できていなかったため、別途修正を加えました。
環境
$ ng --version
@angular/cli: 1.3.0
node: 8.1.3
os: darwin x64
"@angular/material": "^2.0.0-beta.10",
"@angular/router": "^4.2.4",
構成
今回作成したプロジェクトの構成は👇
./app
├── ./app/app-routing.module.ts
├── ./app/app.component.css
├── ./app/app.component.html
├── ./app/app.component.ts
├── ./app/app.module.ts
└── ./app/container
    ├── ./app/container/newest
    │   ├── ./app/container/newest/newest.component.css
    │   ├── ./app/container/newest/newest.component.html
    │   └── ./app/container/newest/newest.component.ts
    ├── ./app/container/random
    │   ├── ./app/container/random/random.component.css
    │   ├── ./app/container/random/random.component.html
    │   └── ./app/container/random/random.component.ts
    └── ./app/container/search
        ├── ./app/container/search/search.component.css
        ├── ./app/container/search/search.component.html
        └── ./app/container/search/search.component.ts
app.componentに<router-outlet>を配置して、Tabの内容はそれぞれsearch、newest、randomを切り替えます。
サンプル
まずは、routingの設定 (app-routing.module.ts)
import { NgModule } from '@angular/core';
import { Routes, RouterModule } from '@angular/router';

import { SearchComponent } from './container/search/search.component';
import { NewestComponent } from './container/newest/newest.component';
import { RandomComponent } from './container/random/random.component';

const routes: Routes = [
  { path: '', redirectTo: 'search', pathMatch: 'full' },
  {
    path: 'search',
    component: SearchComponent
  },
  {
    path: 'newest',
    component: NewestComponent
  },
  {
    path: 'random',
    component: RandomComponent
  }
];

@NgModule({
  imports: [RouterModule.forRoot(routes)],
  exports: [RouterModule]
})
export class AppRoutingModule { }
メインのcomponent (app.component.html, app.component.ts)
<app-header></app-header>
<div class="main-area-container">
<nav md-tab-nav-bar>
  <a md-tab-link
      *ngFor="let routeLink of routeLinks; let i = index"
        [routerLink]="routeLink.link"
        [active]="activeLinkIndex === i"
        (click)="activeLinkIndex = i">
        {{routeLink.label}}
    </a>
</nav>
<router-outlet></router-outlet>
</div>
<app-footer></app-footer>
import { Component } from '@angular/core';
import { Router, ActivatedRoute, NavigationEnd } from '@angular/router';

@Component({
  selector: 'app-root',
  templateUrl: './app.component.html',
  styleUrls: ['./app.component.css']
})
export class AppComponent {
  title = 'app';
  private routeLinks: any[];
  private activeLinkIndex = 0;
  private currentRoute = '';

  constructor(
    private router: Router,
    private activatedRoute: ActivatedRoute
  ) {
    this.routeLinks = [
      { label: 'Search', link: 'search' },
      { label: 'Newest', link: 'newest' },
      { label: 'Random', link: 'random' }
    ];
    router.events.subscribe(event => {
      if (event instanceof NavigationEnd) {
        this.currentRoute = event.url.slice(1);
        console.log(this.currentRoute);
        this.routeLinks.forEach((elm, index) => {
          if (elm.link === this.currentRoute) {
            this.activeLinkIndex = index;
          }
        });
      }
    });
  }
}
ActivatedRouteを使って、コンストラクタ内で現在のパスをsubscribeしています。 routingが変更されるたびに、activeLinkIndexも更新されviewに反映されるようになっています。
その他のrouterで読み込んでいるsearch、newest、randomに関しては省略します。
参考
angular - Angular2 material design mdtabs with router - Stack Overflow
Unicorn pHATを試してみる
pHATシリーズはRaspberry PiのGPIOに接続して、機能拡張ができるというもの。
今回買った、Unicorn pHATは 8x4のRGB LEDが乗ったものです。
スイッチサイエンスでRaspberry Pi Zeroを買うついでにノリで買ってしまったので、セットアップして動かしてみました。
ハードウェアの準備
まずは、Unicorn pHATに付属するピンヘッダーのソケットを取り付けます。 久しぶりにはんだ付けしたので、かなり汚いです…

Raspberry Pi ZeroにはGPIOのピンヘッダが付いていないので、こちらもはんだ付けしました。
使ったのは コレ 。 前に他の用途で買ったものだと思うけど、Unicorn pHATを取り付けると長すぎる気がする。
→強く押し込んだらしっかり刺さった…

ソフトウェアの準備
ターミナルから、必要なソフトウェアの準備を行います。
今回は、Macからssh経由で操作し、ファイルはCyberduckを使いsftp経由で転送しました。
UnicornHatをPythonから操作するためのライブラリをインストールします。
まずは、適当なディレクトリで以下を実行。
$ curl https://get.pimoroni.com/unicornhat | bash
一連のインストールスクリプトの実行が終わると再起動を促されるので、yを選択して再起動します。
Would you like to reboot now? [y/N]
再起動後、再度Raspberry Piのターミナルを開きPythonのインタープリタが使用できることと、インストールしたUnicornHatのライブラリがimportできることを確認します。
一般ユーザーpiで実行したところ、unicornhatのライブラリが/dev/memへのアクセスを要求するため、アクセス権限の問題で実行できませんでした。
今回は、以後rootでPythonを実行することにしました。
$ sudo python
Python 2.7.9 (default, Sep 17 2016, 20:26:04)
[GCC 4.9.2] on linux2
Type "help", "copyright", "credits" or "license" for more information.
>>> import unicornhat
>>>
とりあえず光らせてみる
>>> unicornhat.set_layout(unicornhat.AUTO)
>>> unicornhat.brightness(0.5)
>>> unicornhat.set_pixel(0,0,255,0,0)
>>> unicornhat.show()
>>>
すると、次のように左上のLEDが赤色に点灯します。

unicornhat.set_layout(unicornhat.AUTO)
UnicornHATには通常サイズ(HAT)と半分サイズ(PHAT)があるらしく、それぞれLEDのレイアウトが異なるため、ここで使用するHATの種類を設定します。
ここでは、自動で判別させるためAUTOと指定しました。
unicornhat.brightness(0.5)
1.0を最大値としてLEDの明るさを設定します。
最大の明るさだとかなり明るいので、ここでは半分の0.5としています。
unicornhat.set_pixel(0,0,255,0,0)
点灯するLEDと色を指定します。
第1~2引数でLEDの位置を設定し、第3~5引数は色を設定します。
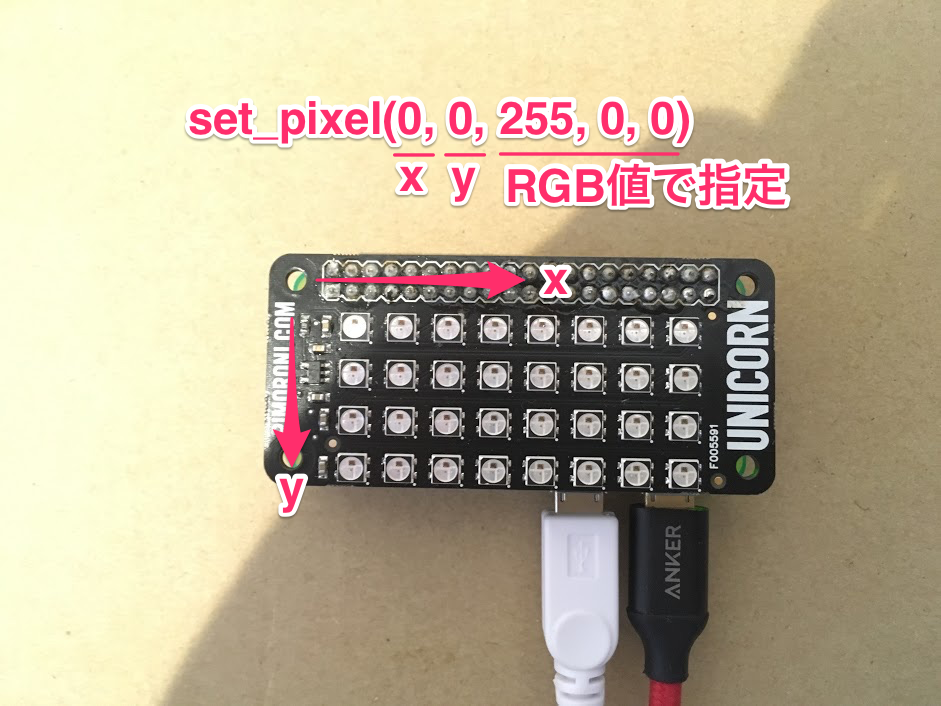
unicornhat.show()
実際に表示させる命令です。
他も試す
全部点灯
import unicornhat as unicorn
from time import sleep

unicorn.set_layout(unicorn.AUTO)
unicorn.brightness(0.5)
width,height=unicorn.get_shape()

for x in range(width):
    for y in range(height):
        unicorn.set_pixel(x, y, 0, 255, 255)
unicorn.show()

while True:
    sleep(1)
get_shape() でレイアウトの幅と高さを取得できるようです。
その他
Unicorn HATのリポジトリにサンプルがたくさんありました。
まずは、ここらへんで遊んでみると楽しいです(雑)。
雑感
ノリで買ったはいいものの1ヶ月ぐらい放置してしまっていたので、ひとまず動作確認?レベルですが触れてよかった。
「GPIOに接続したLEDを操作する」などに比べると、ハードウェアの組み立て的にも、プログラムの容易さ的にも格段と簡単にLED表示が実現できるデバイスだと感じました。
ライブラリさえインストールしてしまえばPythonから操作できるという点は、WebアプリやSlackBotなどとの組み合わせで可能性が広がりそうです。
Python入門してみる(1)
公式ドキュメントを進めてみた記録。
Python Documentation contents — Python 3.6.1 ドキュメント
初めの章はイントロダクション的な感じだったので、ざっと目を通してスキップ。
2. Python インタプリタを使う
2.1. インタプリタを起動する
起動する
$ python
終了する
Ctrl + D ro quit()
2.1.1. 引数の受け渡し
スクリプト内から引数にアクセスする場合、sys.argvを参照する (例: sys.argv[0])
インタプリタにargument.py というファイルに hogeという文字列の引数を渡して実行する場合は以下のようになる
python argument.py hoge
2.1.2. 対話モード
引数無しでインタプリタを起動した場合は、対話モードで実行される (3つの第なり記号)
以下の状態
$ python
Python 3.6.1 (default, Jun 10 2017, 20:33:51)
[GCC 4.2.1 Compatible Apple LLVM 8.0.0 (clang-800.0.42.1)] on darwin
Type "help", "copyright", "credits" or "license" for more information.
>>>
2.2. インタプリタとその環境
2.2.1. ソースコードの文字コード
ソースコードの先頭に以下を記述すると覚えておく
# -*- coding: utf-8 -*-
と言うのは、Python2系までの話らしい。 Python3ではデフォルトのエンコードがUTF-8となっているのでこの記述は不要とのこと。
3. 形式貼らないPythonの紹介
対話型のインタプリタを実際に触って、サンプルを動かしてみようといった内容。
3.1 Pythonを電卓として使う
3.1.1. 数
$ python
Python 3.6.1 (default, Jun 10 2017, 20:33:51)
[GCC 4.2.1 Compatible Apple LLVM 8.0.0 (clang-800.0.42.1)] on darwin
Type "help", "copyright", "credits" or "license" for more information.
>>> 2+2
4
>>> 50-5*6
20
>>> (50-5*6)/4
5.0
>>> 8/5
1.6
>>> 17/3
5.666666666666667
>>> 17//3 # //演算子を使うと小数部を切り捨てて整数部のみを返却する
5
>>> 17%3
2
>>> 5*3+2
17
>>> 5**2 # **でべき乗の計算が可能
25
>>> 2**7
128
>>> width=20
>>> heigth=5*9
>>> width*heigth
900
>>> n
Traceback (most recent call last):
  File "<stdin>", line 1, in <module>
NameError: name 'n' is not defined
>>> 3*3.75/1.5
7.5
>>> 7.0/2
3.5
>>> tax=12.5/100
>>> price=100.50
>>> price*tax
12.5625
>>> price+_
113.0625
>>> round(_,2)
113.06
>>>
3.1.2. 文字列型(string)
文字列操作に関して。
$ python
Python 3.6.1 (default, Jun 10 2017, 20:33:51)
[GCC 4.2.1 Compatible Apple LLVM 8.0.0 (clang-800.0.42.1)] on darwin
Type "help", "copyright", "credits" or "license" for more information.
>>> 'hoge moge'
'hoge moge'
>>> 'doesn\'t'
"doesn't"
>>> "doesn't"
"doesn't"
>>> '"Yes," he said.'
'"Yes," he said.'
>>> "\"Yes,\" he said."
'"Yes," he said.'
>>> '"Isn\'t," she said.'
'"Isn\'t," she said.'
>>>
ここまでチュートリアルに記載の内容を順に進めてきたが、幾つかのサンプルをスキップ。
雑感
高専時代はスーパー不真面目学生だったこともあり、授業でプログラミング言語を勉強した記憶は殆ど無いように感じる。
作りたいものベースで、必要な言語やフレームワークの使い方を都度ググりながら覚えるというようにプログラミング言語と向き合ってきたので、
公式のチュートリアルを進めるという経験は、案外初めてかもしれない。
あとで見返してみると、中身の無い記事だろうと感じるだろうけどひとまずPythonに関してはこんな感じで続けようと思っている。
MacでPythonを始めようと思ったときにやったこと
この記事は、以下の記事を参考にやった作業をまとめたメモです(環境構築しただけです)。 http://qiita.com/spyc/items/73d1295f8b3dde3b49ca
次の職場ではPythonをガッツリ使うことになりそうなので、公式ドキュメントを見ながらゆったり体系的に勉強する機会を作っても良いかなぁと思った次第。 人から貰ったPythonスクリプトを実行した記憶があったので、実行環境は整っていたはず。 Pythonには2系と3系が存在することも薄っすらと認識していて、どうせなら3系をつかいたなぁと。←と現在この程度のPython力です。
環境
まずは環境
$ sw_vers
ProductName:    Mac OS X
ProductVersion:    10.11.6
BuildVersion:    15G1212
$ brew -v
Homebrew 1.2.2
Homebrew/homebrew-core (git revision 80032; last commit 2017-06-09)
確かPython2系は入っていた気がするが…
$ python
Python 2.7.10 (default, Oct 23 2015, 19:19:21)
[GCC 4.2.1 Compatible Apple LLVM 7.0.0 (clang-700.0.59.5)] on darwin
Type "help", "copyright", "credits" or "license" for more information.
>>>
ということで、どうやら2.7系は入っているらしい。
pyenv(バージョン管理ツール)の導入
Node.jsで言うところのnodebrewとイメージすればよいだろうか。 pyenvというのをインストールしました。今回はbrew経由で。
brew install pyenv
==> Installing dependencies for pyenv: openssl
==> Installing pyenv dependency: openssl
==> Downloading https://homebrew.bintray.com/bottles/openssl-1.0.2l.el_capitan.bottle.tar.gz
######################################################################## 100.0%
==> Pouring openssl-1.0.2l.el_capitan.bottle.tar.gz
==> Using the sandbox
==> Caveats
A CA file has been bootstrapped using certificates from the SystemRoots
keychain. To add additional certificates (e.g. the certificates added in
the System keychain), place .pem files in
  /usr/local/etc/openssl/certs

and run
  /usr/local/opt/openssl/bin/c_rehash

This formula is keg-only, which means it was not symlinked into /usr/local,
because Apple has deprecated use of OpenSSL in favor of its own TLS and crypto libraries.

If you need to have this software first in your PATH run:
  echo 'export PATH="/usr/local/opt/openssl/bin:$PATH"' >> ~/.bash_profile

For compilers to find this software you may need to set:
    LDFLAGS:  -L/usr/local/opt/openssl/lib
    CPPFLAGS: -I/usr/local/opt/openssl/include
For pkg-config to find this software you may need to set:
    PKG_CONFIG_PATH: /usr/local/opt/openssl/lib/pkgconfig

==> Summary
🍺  /usr/local/Cellar/openssl/1.0.2l: 1,709 files, 12.1MB
==> Installing pyenv
==> Downloading https://homebrew.bintray.com/bottles/pyenv-1.0.10_1.el_capitan.bottle.tar.gz
######################################################################## 100.0%
==> Pouring pyenv-1.0.10_1.el_capitan.bottle.tar.gz
🍺  /usr/local/Cellar/pyenv/1.0.10_1: 563 files, 2.2MB
パスを設定する。 .bash_profileに以下を追記
export PYENV_ROOT="${HOME}/.pyenv"
export PATH="${PYENV_ROOT}/bin:$PATH"
eval "$(pyenv init -)"
ターミナルを再起動してpyenvコマンドが使えることを確認する。
$ pyenv
pyenv 1.0.10
Usage: pyenv <command> [<args>]

Some useful pyenv commands are:
   commands    List all available pyenv commands
   local       Set or show the local application-specific Python version
   global      Set or show the global Python version
   shell       Set or show the shell-specific Python version
   install     Install a Python version using python-build
   uninstall   Uninstall a specific Python version
   rehash      Rehash pyenv shims (run this after installing executables)
   version     Show the current Python version and its origin
   versions    List all Python versions available to pyenv
   which       Display the full path to an executable
   whence      List all Python versions that contain the given executable

See `pyenv help <command>' for information on a specific command.
For full documentation, see: https://github.com/pyenv/pyenv#readme
Python3のインストール
Pythonの公式ドキュメントを見ると、現時点の最新は3.6.1らしい。
$ pyenv install 3.6.1
Downloading Python-3.6.1.tgz...
-> https://www.python.org/ftp/python/3.6.1/Python-3.6.1.tgz
Installing Python-3.6.1...
Installed Python-3.6.1 to /Users/d_ojima/.pyenv/versions/3.6.1
次のコマンドでpyenvでインストールしたバージョンの一覧が確認できる。
$ pyenv versions
* system (set by /Users/d_ojima/.pyenv/version)
  3.6.1
バージョンを切り替えます。
$ pyenv global 3.6.1
$ pyenv rehash
切り替わっているかの確認をします。
$ pyenv versions
  system
* 3.6.1 (set by /Users/d_ojima/.pyenv/version)
$ python --version
Python 3.6.1
pyenv優秀
もともと入っていた2.7系もsystemという名前でpyenvから切り替えられるのみたいです。
pipのインストール
Node.jsで言うところのnpmだと信じておく。 Pythonの標準的なパッケージ管理ツール。
$ sudo easy_install pip
Searching for pip
Best match: pip 9.0.1
Adding pip 9.0.1 to easy-install.pth file
Installing pip script to /Users/d_ojima/.pyenv/versions/3.6.1/bin
Installing pip3 script to /Users/d_ojima/.pyenv/versions/3.6.1/bin
Installing pip3.5 script to /Users/d_ojima/.pyenv/versions/3.6.1/bin

Using /Users/d_ojima/.pyenv/versions/3.6.1/lib/python3.6/site-packages
Processing dependencies for pip
Finished processing dependencies for pip
pipが使えるか確認。
$ pip list
DEPRECATION: The default format will switch to columns in the future. You can use --format=(legacy|columns) (or define a format=(legacy|columns) in your pip.conf under the [list] section) to disable this warning.
pip (9.0.1)
setuptools (28.8.0)
pipコマンド自体は通るが、何やら赤文字でDEPRECATIONが表示されている。
毎回この表示は流石にうざいので、素直に従ってみます。
次の記事を参考にしました。
pip.confという設定ファイルに出力フォーマットの設定をすればいよことがわかったので。
$ cd ~/Library/'Application Support'
$ mkdir pip && cd pip
$ touch pip.conf
作成したpip.confに以下を記述
[list]
format = legacy
再度確認してみます。
$ pip list
pip (9.0.1)
setuptools (28.8.0)
警告が表示されなくなりました。 めでたし。
雑感
環境構築的な作業は久々にやった気がする。
毎回思うけど、リファレンス通りにやってもバージョン違いなどが原因で必ずと言っていいほど一筋縄には行かない印象。
これからどんどんPython書くどん!